I recently posted this image on my social media page (click here) and said that I would write a blog post about hyperfocal distances, well here's the post.
Not usually thought of as a technique that comes into mind when photographing wildlife I will show you how it affects any image. Mostly however people think of hyperfocal distances being important for landscape images. Although I am writing a post about how important this is, I would also say that you should never sacrifice the settings which will get you the image you have created in your mind in order to get the whole photograph in focus, because there are always other techniques that you can use - focus stacking would be the next point of call to achieve full focus.
As we learn photographic practices, depth-of-field plays a huge part of most people's artistic intent, but the technical aspect of controlling depth-of-field tends to not make it past the basic - smaller hole, larger area in focus and vice-versa. A lot of people will have got by never needing to know any more, but what if you had a landscape that you loved and so you posted it on Facebook, then someone asked you to print it, however when they received the print the background matter was out of focus (which didn't come across at the low resolution of an image compressed by Facebook)...
Well to make sure that this doesn't happen (or at least minimise the problem), carry on reading this blog and remember the simple steps that will give you images that are sharp from front of back.
*******
The most important thing you need to do is use manual focus! I can't help but notice anymore that when you are out at a photography hotspot and there are lots of people taking landscapes, you can still hear the whirring of autofocus. All those people are allowing their camera to do something for them. If you have an idea of a photograph in your head, your camera can't read your mind and so it is extremely unlikely that it can produce the same results as you could in full manual.
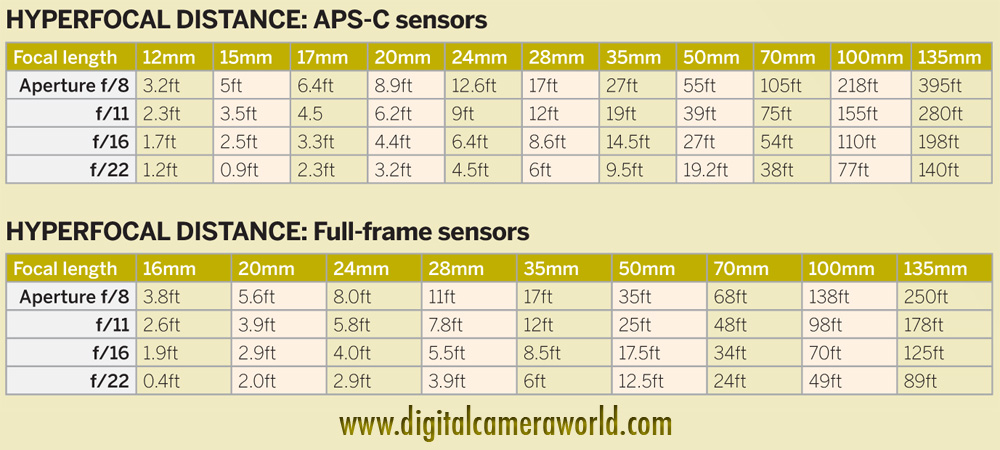
I started learning about hyperfocal distances through a tool given away free in an amateur photographer magazine. This was basically an interactive tool on which you would input your settings and it would tell you where to set your focus. Shown below is a table of a few hyperfocal distances (taken from digitalcameraworld.com).
(If you don't know whether you have a crop or full frame sensor inside your camera a quick Google search of your model will tell you).
After a while of referring to these graphs, tables and tools, you will get the idea and when you arrive at a scene, you'll be able to tell where to focus depending on the distance from your camera to your subject, your aperture and your focal length. As most people don't change their equipment very often, you get used to how your personal setup works in different situations quite quickly. If I take my Tokina 11-16mm out for a shoot I know exactly how to set the focus, but if I were to use a mid range zoom, it would take a minute to think about and calculate the hyperfocal distance needed.
*******
I also want to show you a couple of examples of how the depth-of-field plays a large part in all images - landscape or otherwise.

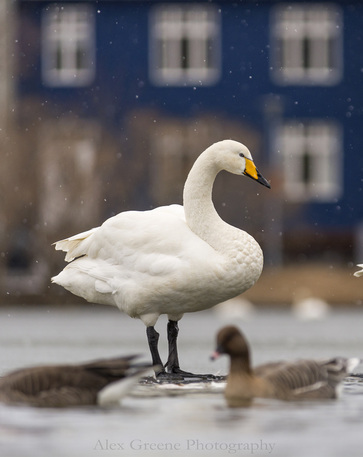
So obviously, for this image (Reykjavik, Iceland) I wasn't aiming for the whole image to be in focus, but the aperture I used was the biggest decision when taking the photograph. I wanted the background to have enough detail for the viewer to be able to see that the swan is in front of a house, without the detail being too distracting.
At first I assumed that F/4 would make the background softer than I wanted, therefore I started with F/8 and worked my way down until it looked how I wanted - which just so happened to be F/4!
At first I assumed that F/4 would make the background softer than I wanted, therefore I started with F/8 and worked my way down until it looked how I wanted - which just so happened to be F/4!
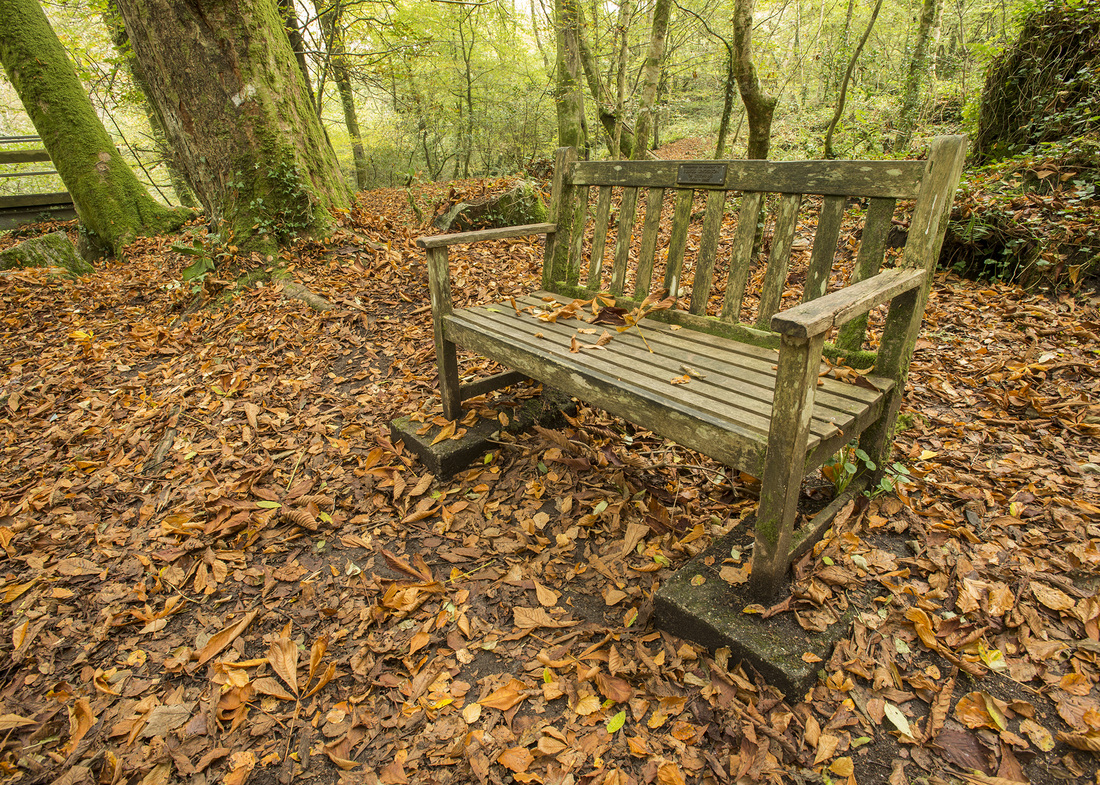
The other example (below) is of a situation in which I didn't just pick a really small aperture (i.e. F/16 - 22) and focus one third into the image to get it all in focus. Instead, the furthest you can see in the picture is only about 100m because of all the tree cover; therefore I could use a slightly larger aperture (F/11), keep the shutter speed the same and lower the ISO.
So, what was the point of the changes, why not use F/16?
Well, there was some wind on this day and so the leaves were moving a little bit. Not enough to be an artistic effect, instead, just enough to make the leaves look out of focus and blurry. Therefore, my ISO was up slightly and this (however minutely) was adding noise to the image. When you increase your aperture you will make the image brighter (presuming you are shooting in Manual) and so you have to either change your ISO or shutter speed. In the case of this image, I didn't need to change the shutter speed (I already had it set to remove the movement blur of the leaves) and so I was left with changing the ISO and lowering the noise - which is never a bad thing!
If you've carried on reading down to this point, I hope you enjoyed the post and found it helpful in some way. Thanks for reading and feel free to share on social media and/or comment below if you have any questions or wish to point out something I haven't talked about and you think other people may find useful.
Thanks again!
Thanks again!


